Turn a Sequence of Images to Video and Go Viral
Turning a simple sequence of images into a polished, high-retention video is one of the easiest ways to create killer content for TikTok, Reels, and Shorts. This entire workflow can now be almost completely automated with AI-powered tools, letting you pump out dynamic, engaging videos in minutes, not hours. Forget about complex, traditional editing software.
The New Creator Workflow: From Images to Viral Videos
Long gone are the days when creating a video meant you had to film something, get on camera, and then spend ages painstakingly editing everything together. The most successful creators today, especially those running faceless accounts, e-commerce brands, or managing social media, are scaling their output by transforming static images into dynamic stories. This isn't just a shortcut; it's a massive strategic advantage.
This whole shift is driven by the insane demand for fast, scalable content. The market numbers back this up, too. The AI video generator market was valued at USD 534.4 million in 2024 and is projected to explode to USD 2,562.9 million by 2032. That's a nearly fivefold jump, which shows just how critical these 'sequence of images to video' workflows have become.
This new way of working breaks the process down into three simple stages.
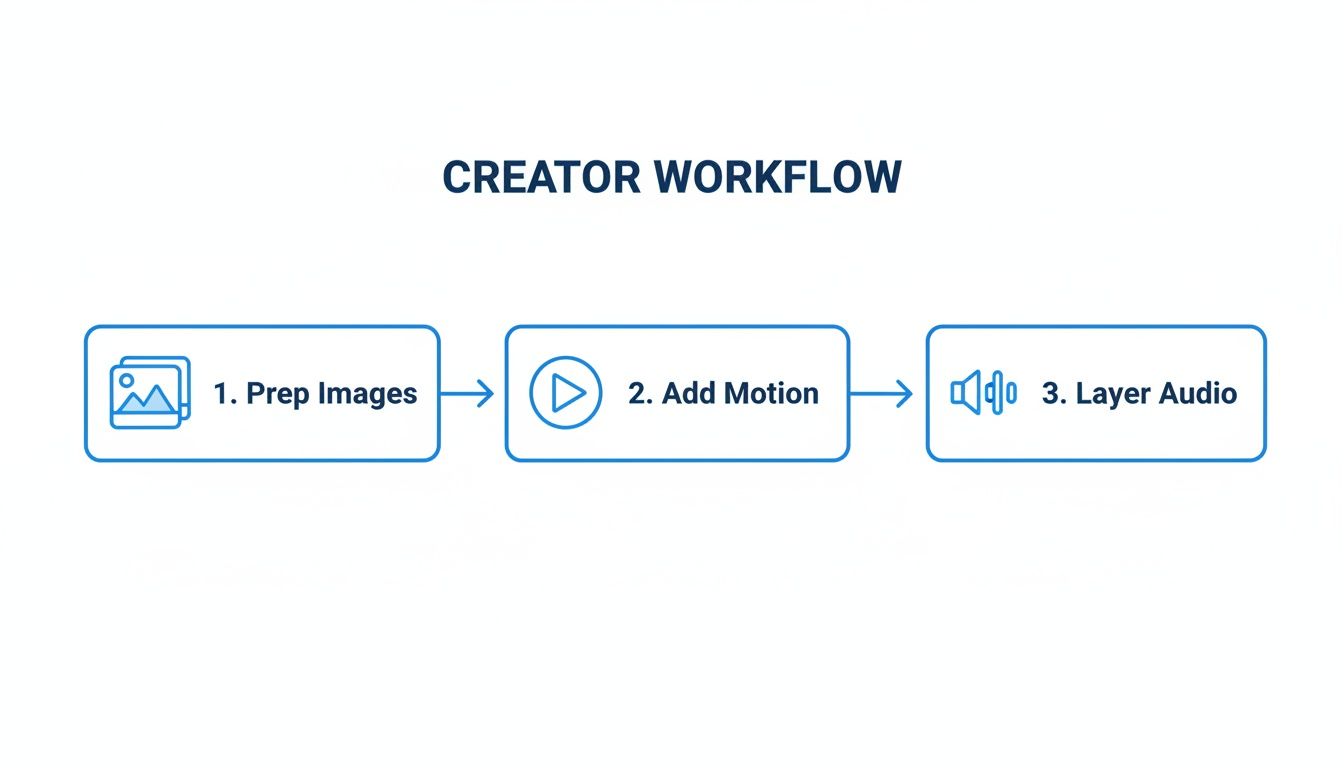
As you can see, the idea is to systematically turn your static assets into a finished video. You start with the visual foundation, add movement to bring it to life, and then layer on audio for that crucial emotional punch.
The real power of this workflow is its pure efficiency. Instead of getting lost in technical settings, you can focus on what really matters—storytelling. Let the automation handle all the heavy lifting for you.
To really get a handle on this, mastering how to create video from image AI is a total game-changer. In this guide, we'll walk through every piece of the puzzle, including:
- Image Preparation: Finding great visuals and getting the aspect ratio right from the start.
- Cinematic Motion: Using pans and zooms to make your static images feel dynamic and alive.
- Audio Layering: Dropping in AI voiceovers and the perfect music track to drive engagement.
- Caption Crafting: Adding animated subtitles to keep your viewers glued to the screen.
Mastering these core elements is the key to turning an image sequence into a video that actually performs.
Core Elements for Converting Images to Viral Video
This table breaks down the essential components you need to master. Getting these right will make all the difference between a video that flops and one that goes viral.
| Component | Why It Matters | Key Objective |
|---|---|---|
| Visuals & Format | The foundation of your video. The right images in the correct 9:16 format prevent awkward cropping and keep viewers engaged. | Start with high-quality, relevant images perfectly sized for vertical platforms. |
| Motion & Pacing | Static images are boring. Motion (like the Ken Burns effect) and quick pacing create a dynamic experience that holds attention. | Make every image feel alive and keep the video moving at a brisk, engaging pace. |
| Audio Layers | Audio creates emotion. A compelling voiceover tells the story, while music sets the mood and hooks the viewer. | Combine a clear voiceover with background music to create an immersive auditory experience. |
| Captions & Text | Most users watch with the sound off. Animated captions make your video accessible and keep people watching until the end. | Ensure your message lands, with or without sound, by using clear, animated text overlays. |
By nailing these four areas, you can build a sustainable content engine that churns out high-quality videos with minimal effort. If you want to get a head start, check out our guide on how to create videos with AI.
Alright, before you even think about stitching anything together, we need to talk about your raw materials: the images. Getting this part right is the difference between a polished, professional-looking video and something that just feels like a clunky slideshow. It all starts with sourcing the right visuals.
Whether you're pulling from your own photo library, using stock images, or generating them with AI, the single most important thing is visual consistency. You want a set of images that feel like they belong together. A video that jumps from a photorealistic shot to a cartoonish one and then to a vintage-style photo is just plain jarring. Stick to a cohesive style, color palette, and overall vibe.
Nail the Technicals First
Once you’ve gathered your images, there are two crucial settings you absolutely must get right from the get-go: aspect ratio and frame rate. Sorting these out now will save you a world of pain later.
For platforms like TikTok, Instagram Reels, and YouTube Shorts, the 9:16 vertical aspect ratio is king. If you try to crop a standard horizontal photo, you’ll likely chop off the most important parts. The best move is to find or create images that are already vertical. This way, your subject stays perfectly framed for everyone scrolling on their phones.
Next up is frame rate, or frames per second (FPS). This is what makes your video feel smooth. Even though you’re starting with still images, your video editor will render them into a moving sequence at a specific FPS.
The sweet spot for a smooth, cinematic feel on social media is either 24 or 30 FPS. Anything lower can look choppy, and going any higher is just overkill for this kind of content.
Think Like a Storyteller
With the technical stuff out of the way, it’s time to put on your director’s hat. The order of your images is everything. You're not just flashing pictures on a screen; you're taking your viewer on a tiny journey. This is where you separate the amateur stuff from the videos that really hook people in.
Let’s say you’re a brand launching a new gadget. A smart sequence might look like this:
- Image 1: A super close-up, mysterious shot to build some intrigue.
- Image 2: Pull back to show the product in a cool, real-world setting.
- Image 3: A detail shot that highlights its killer feature.
- Image 4: A shot of someone genuinely enjoying the product.
See how that works? It builds curiosity, gives context, shows value, and closes with a relatable human element. Or, if you're a travel creator, you could start with a shot from the plane window, then a famous landmark, followed by a picture of amazing local food, and end on a beautiful sunset.
Every single image needs to have a job to do and flow naturally into the next one. This strategic planning is the real secret to turning a simple stack of pictures into a video that actually tells a story and keeps people watching.
Mastering Motion Pacing and Visual Rhythm

This is where your static images really come to life. Let's be honest: a simple, lifeless slideshow is a guaranteed skip on platforms like TikTok and Reels. To actually hold someone's attention, you have to inject your sequence of images with a dynamic rhythm that feels intentional and alive.
The easiest and most effective way to pull this off is with the Ken Burns effect. It's a classic for a reason. This technique involves adding subtle pans and zooms to your still images, which creates a feeling of motion and helps guide the viewer's eye to important details. Instead of just a flat picture, each image becomes a mini-cinematic moment.
Most modern AI video tools, like ClipShort, can handle this for you automatically. You can often apply random movements to keep things interesting or dial in the specific start and end points for each image if you want more creative control.
Finding the Right Pacing for Your Story
Adding motion is just one part of the equation. The timing of each image is just as critical for setting the video’s pace and overall mood. How long each visual stays on screen is what dictates the energy of your content.
There’s no magic number here. The perfect pacing depends entirely on the story you’re trying to tell.
Let’s look at two completely different scenarios:
- High-Energy "Top 5" List: Imagine a fast-paced video counting down the "Top 5 Travel Gadgets." You need quick cuts. Each image might only be on screen for 1 to 2 seconds. This rapid-fire pace builds excitement and keeps the viewer leaning in, wondering what’s next.
- Thoughtful Historical Narrative: Now, think about telling a story about a historical event using old photographs. You need to give the viewer time to actually see the details. In this case, a slower pace of 3 to 4 seconds per image lets the voiceover land and allows the emotional weight of the visual to sink in.
This control over timing is what separates a decent video from a truly great one. It’s all about matching the visual rhythm to the cadence of your narrative.
Aligning Timing with Your Audio
Here's a more advanced trick: sync your image timing directly to your audio track, especially an AI voiceover. A lot of tools are getting smart enough to analyze the cadence of your narration and automatically adjust the duration of each image to match.
This automated sync is a total game-changer. When a new image appears precisely as a new sentence or key point begins in the voiceover, the whole video just feels more polished and professional. It creates a seamless experience that keeps people locked in.
The goal is to make the entire package—visuals, motion, and audio—work together as a single, cohesive unit. To help you nail this, here's a quick guide I use when deciding on the pacing for my own projects.
Image Pacing Guide for Short-Form Video
This table breaks down different image display durations and what kind of video they work best for. Think of it as a starting point for finding the right rhythm for your content.
| Image Duration | Best For (Video Style) | Audience Impact |
|---|---|---|
| 0.5 - 1.5 seconds | Fast-paced edits, meme-style content, or quick-cut montages. | Creates a high-energy, exciting, and sometimes chaotic feel. Perfect for grabbing attention instantly. |
| 1.5 - 3 seconds | Standard storytelling, educational content, and product showcases. | Provides enough time to process information without losing momentum. The sweet spot for most short-form videos. |
| 3 - 5 seconds | Emotional narratives, detailed visual explanations, and quote videos. | Encourages reflection and allows the viewer to connect more deeply with the visual and audio. |
By mastering both motion and pacing, you can create a compelling visual rhythm that makes your content feel professionally edited and, most importantly, impossible to scroll past.
Layering Audio and Captions to Boost Engagement

Fantastic visuals and snappy pacing get you halfway there, but it's the final layers of audio and text that really make your video stop the scroll. These elements work in tandem to grab attention, forge an emotional connection, and make your content accessible to a much wider audience.
Let's start with the narration. Modern AI voiceovers have come a long way, offering an incredible range of tones, accents, and languages. This lets you dial in the perfect voice for your target audience. For example, a video breaking down a new tech product might land better with a clear, confident American accent, while a visual story about the Scottish Highlands just feels more authentic with a gentle Scottish brogue.
Next up is the music. This isn't just filler noise; it's a powerful tool for setting the entire mood of your video. Your goal is to find a royalty-free track that complements your voiceover without drowning it out. A solid rule of thumb is to set the music volume to about 10-15% of your narration level. This creates a subtle emotional undercurrent that lifts the story without being distracting.
Crafting Captions That Hold Attention
With so many people watching videos with the sound off, captions have gone from a "nice-to-have" to a must-have. And I'm not talking about those boring, static subtitles at the bottom of the screen. To keep viewers hooked, you need animated, word-by-word captions that create a dynamic experience and keep their eyes glued to the screen.
These "karaoke-style" captions pull double duty:
- Accessibility: They make your video perfectly understandable for anyone in a silent environment or for those with hearing impairments.
- Retention: The constant on-screen motion gives the viewer’s eye something to follow, making it far more likely they’ll stick around until the end.
When you're designing your captions, readability is everything. Pick a bold, clean font that pops against your background images. Don't be shy about using a splash of color to highlight key words, and you can even sprinkle in some well-placed emojis to add personality. For a deeper dive, check out our complete guide on how to add captions to videos for maximum impact.
The real magic happens when you combine a human-like voiceover, emotive music, and dynamic text. You're creating a multi-sensory experience that ensures your message lands, sound on or sound off. This layered approach is infinitely more engaging than a simple slideshow.
The demand for tools that can pull all this together automatically is exploding. Think about it: platforms like TikTok see 25 million videos uploaded every single day, and YouTube gets 3 million new ones. This insane volume has created a huge need for 'sequence of images to video' technology, with AI generators paving the way for creators to produce faceless content that instantly hooks audiences.
Optimizing Your Video for Platform Success
You’ve done the creative work and turned a simple sequence of images into a dynamic video. Awesome. But don't drop the ball now—this last part is where many creators trip up. Without the right export and posting strategy, even incredible content can get completely buried by the algorithm.
Let's start with your export settings. This is non-negotiable. For the best quality on TikTok, Instagram Reels, and YouTube Shorts, you absolutely need to export in 1080x1920 resolution using the MP4 file format. These are the specs that guarantee your video looks crisp and plays without a hitch on any phone.
If you want to go deeper on this, we break it all down in our complete guide on https://www.clipshort.co/en/blog/vertical-video-dimensions.
Platform-Specific Publishing Tactics
Once your video file is good to go, you have to think like each platform thinks. A "post everywhere" strategy is a recipe for getting nowhere.
For TikTok, it’s all about gaming the algorithm with trending audio. A sneaky but effective trick is to add a popular sound underneath your AI voiceover and turn the volume way down to 1-5%. The algorithm picks it up, helps categorize your content, and pushes it to a much wider audience. It's a small tweak that can give you a massive initial boost.
When you move over to Instagram Reels, the description and hashtags suddenly become much more important. Your first sentence needs to be a killer hook. Then, use a smart mix of big, broad hashtags and smaller, niche ones to pull in your target audience from different angles. For example, a video on AI gadgets might use #AI, #Tech, and #FutureTech to hit various discovery paths.
And on YouTube Shorts, the title is everything. It's your one shot to earn the click. Aim for something that sparks curiosity and clearly states the value. A title like "This AI Tool Changes Everything" is going to crush a generic one every time because it builds intrigue right away.
Your video's first two seconds are the most critical real estate you have. You need a powerful visual or a narrative hook to stop the scroll instantly. And don't forget a clear call-to-action (CTA) at the end—a simple "Follow for more" or "Comment your thoughts" tells people what to do next and drives up your engagement.
It's also worth remembering that not all feedback will be positive. Learning how to handle criticism is a key part of growing as a creator, and this guide on responding to negative feedback has some great tips.
This whole workflow, from a folder of images to a polished video, is being completely transformed by generative AI. It's no wonder that global private investment in this space hit a staggering $33.9 billion in 2024. The tools emerging from this boom can turn a text prompt into a full-blown video, complete with voiceovers in over 50 languages. For creators, this is a game-changer.
Common Questions About Turning Images Into Videos
Even with powerful tools at your fingertips, turning a folder of images into a compelling video can feel a bit tricky at first. It’s totally normal to have questions.
Let's walk through some of the most common hurdles creators face. Getting these right will make a massive difference in your workflow and the final quality of your videos.
How Many Images Do I Actually Need?
This is easily the most common question I get. The honest answer? There’s no magic number. It all comes down to your video's desired length and, more importantly, its pacing.
Think backward from the finish line. If you're aiming for a punchy, 15-second TikTok where visuals change quickly, maybe each image is on screen for only 1.5 seconds. A little quick math tells you that you'll need exactly 10 images.
But what if you want a more thoughtful 30-second video where each point sinks in? If you give each image 3 seconds of screen time, you'd still use 10 images. The key is to decide on the feeling you want to create first, then do the math.
How Do I Make It Look Smooth and Not Like a Slideshow?
Ah, the classic slideshow problem. The goal is to make your video feel like a single, seamless piece of content, not a clunky PowerPoint presentation. Smoothness comes from blending motion, story, and sound.
- Keep It Moving: The easiest win here is the Ken Burns effect. Applying a slow, subtle pan or zoom to every single image creates a constant, gentle motion. This simple trick fools our brains into perceiving a continuous flow rather than a series of static pictures.
- Tell a Coherent Story: Your images need to make sense together. Make sure each visual logically leads to the next, almost like you're building a visual sentence. This narrative thread is what will pull your viewer along.
- Use Audio to Bridge the Gaps: A consistent voiceover or a solid background music track is like the glue that holds everything together. It papers over the cuts between images, making them feel less jarring and more intentional.
The secret to a professional-looking video is creating a unified experience. When your motion, story, and audio all work together, the transitions naturally feel invisible, and the viewer stays completely immersed in your content.
This is the core principle for mastering the art of converting images into a polished video.
Can I Mix In Video Clips with My Images?
Absolutely! In fact, you should. Weaving short video clips into your sequence of images is a killer technique for boosting engagement. It breaks up the visual pattern and adds a dynamic energy that static images alone can't always provide.
Imagine this: you build suspense with four still images, and then—bam!—you hit them with a 2-second video clip for the reveal. It’s a powerful way to add texture and surprise your audience, which is a massive win for viewer retention.
Just make sure any clips you use match the 9:16 aspect ratio and the general vibe of your images. Consistency is still king.
Ultimately, the best way to get good at this is to just start doing it. Make a simple video with only images. Then, on the next one, try mixing in a video clip. Experiment with different timings and audio layers. Each project is a new lesson in what works for your audience, helping you build an efficient workflow that pumps out content people actually want to watch.
Ready to stop juggling complex editors and start creating viral videos in minutes? ClipShort automates the entire process, from AI voiceovers and cinematic motion to animated captions. Turn your ideas into scroll-stopping short-form content today at ClipShort.