How to Add Captions to Videos A Practical Guide
Let's be honest: if you're making videos today and not using captions, you're leaving views on the table. It’s that simple.
In a world where most of us scroll through social feeds with our phones on silent, captions have gone from a "nice-to-have" accessibility feature to a non-negotiable part of a successful video strategy. Adding that little bit of text at the bottom of your screen can be the difference between someone stopping to watch or just scrolling right past.
The numbers don't lie. Video is projected to make up a massive 82% of all internet traffic by 2025. To get a piece of that action, you have to cater to how people actually watch content—and that means with the sound off. You aren't just adding text; you're future-proofing your content.
Why Captions Are Your Secret Weapon
Captions do way more than just show what's being said. They create a better, more inclusive experience for everyone, no matter where or how they're watching. Think of it as opening up new lanes for your message to get through.
Here's what you really gain:
- Hook a Silent Audience: Let’s face it, 85% of social media users watch videos on mute. Whether they're on a crowded train, in a quiet office, or just don't want to be disruptive, captions are what keep their eyes on your content.
- Make Your Content Accessible: You instantly open your videos up to millions of people who are deaf or hard of hearing. It’s an easy way to make your content more inclusive and welcoming to a broader community.
- Get Found More Easily (SEO): Search engines like Google and YouTube can't watch a video, but they can definitely read text. Captions give them a full transcript to crawl, helping them understand what your video is about and rank it for the right keywords.
So, how do you get started? It really boils down to what you need: speed, control, or platform-native simplicity. This flowchart gives you a quick visual breakdown.
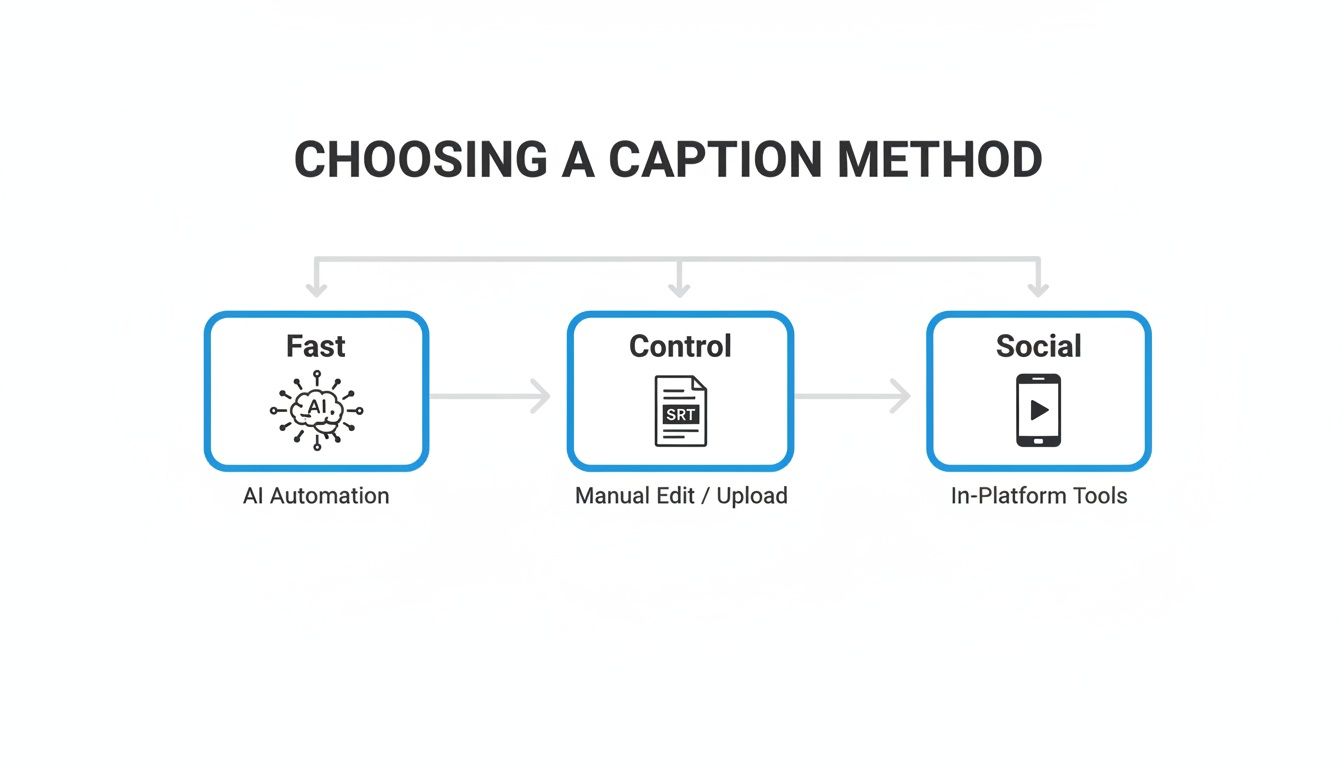
As you can see, your choice depends on balancing speed with precision. To help you decide, here's a quick cheat sheet.
Quick Guide to Captioning Methods
The fastest way to add captions is with an AI tool like Kapwing. For maximum control, manually create an SRT file. For social media, use the built-in app features.
| Method | Best For | Our Recommendation |
|---|---|---|
| AI Auto-Captions | Speed and efficiency, especially for long videos. | Perfect for creators who need to move fast and are okay with minor clean-up. |
| Manual SRT Files | Maximum accuracy, creative control, and multi-language support. | The go-to for professional work where every word and pause matters. |
| In-App Social Tools | Quick captions for TikTok, Instagram Reels, and YouTube Shorts. | Ideal for on-the-fly content that lives and breathes on one platform. |
Each method has its place, and the best one is simply the one that fits your workflow.
For a deep dive into the nitty-gritty of each method, check out this a comprehensive guide to adding captions to videos which walks you through the entire process from start to finish.
Using AI Tools for Fast and Easy Captions
When you need to get captions on a video fast without making them look cheap, AI is your best friend. Honestly, this is the exact method I use for the vast majority of my own social media content. It’s the perfect blend of speed and surprising accuracy, letting me caption videos in minutes instead of hours.
Tools like Kapwing, Descript, or VEED have made this process ridiculously simple. The whole idea is to let the software do the heavy lifting—the transcription—and leave you with a nearly finished product that just needs a quick human proofread. You're basically trading a few minutes of review for what used to be hours of painstaking manual work.
For any creator trying to keep up with a consistent posting schedule, this is a total game-changer. You can stop getting bogged down in tedious edits and get back to what you do best: creating more content.
The AI Captioning Workflow Step by Step
Getting started is way more straightforward than you might think. Your first move is to simply upload your edited video file into whichever AI tool you've chosen. Once it’s uploaded, you'll see a button that says something like "Auto-generate subtitles" or "Transcribe video." This is where the magic kicks in.
The AI gets to work, listening to your audio and spitting out a text transcript complete with timestamps. Before you can truly add captions to your videos, you have to turn the spoken words into text. If you want to get a better handle on this specific part of the process, you can learn more about how to transcribe audio to text and the different ways to do it.
After just a few moments, the software will show you the captions it created, usually laid out right on your video timeline.

The image above is a great example of a simple, effective caption. It’s clear and easy to read, adding to the experience without stealing the show. That’s always the goal: captions that feel like they belong.
Refining and Styling Your Captions
Even with crystal-clear audio, AI transcription isn't perfect, though it often hits 95% accuracy. It might stumble over unique names, industry jargon, or get confused by a little background noise. This is why your final review is so important.
Play the video and read through the generated text line by line. This is your chance to:
- Fix typos and misinterpretations: Catch any words the AI fumbled.
- Nudge the timing: Easily drag the caption blocks on the timeline to make sure they sync up perfectly with the dialogue.
- Improve the flow: Break up long, clunky sentences into shorter, punchier lines that are easier to read on a screen.
My personal rule is to never let a caption run longer than two lines of text. This keeps them from hogging the screen and makes them scannable—a must-have for anyone scrolling through a fast-paced social feed.
Once the text is perfect, it's time to make it look good. Most tools give you a ton of customization options. Don't settle for the default! Pick fonts and colors that match your brand’s look and feel. A high-contrast, sans-serif font is almost always the best bet for legibility on small mobile screens.
Many creators are finding that the right software makes all the difference. For more inspiration, check out some of the best AI tools for content creators that can help with more than just captions. This final styling step is what turns your captions from a simple accessibility feature into a core part of your video's visual identity.
Mastering Manual Captions with SRT Files
While AI tools offer incredible speed, sometimes a project demands a level of precision that only a human touch can provide. This is where creating your own SRT (SubRip Subtitle) file comes in.
Think of it as the gold standard for projects like corporate training modules, detailed documentary films, or any video needing multiple language options for a global audience. An SRT file gives you complete authority over every word, every pause, and every nuance.

At its core, an SRT file is just a plain text document. It breaks your dialogue into sequential chunks, each paired with precise start and end timestamps. This tells the video player exactly when to show and hide each line. The best part? You don’t need fancy software—a basic text editor like Notepad on Windows or TextEdit on a Mac is all it takes.
The Anatomy of an SRT File
Getting the format right is everything. If you don't follow the structure exactly, the file won't work when you try to import it into your video editor or upload it to a platform like YouTube.
Each caption entry is a simple, four-part block:
- Sequence Number: A number that keeps your captions in order (1, 2, 3, etc.).
- Timestamp: The start and end times for the caption, formatted like this:
hours:minutes:seconds,milliseconds --> hours:minutes:seconds,milliseconds. - Caption Text: The actual text you want on screen. Keep it to one or two lines for easy reading.
- Blank Line: A single empty line that separates one caption block from the next.
A common mistake that trips people up is forgetting the milliseconds in the timestamp or using a period instead of a comma. This tiny detail can break the whole file, so always double-check your formatting!
Here’s what two entries look like in a real SRT file:
1 00:00:05,250 --> 00:00:07,600 Welcome to our tutorial on how to add captions to videos.
2 00:00:08,100 --> 00:00:10,950 Today, we're focusing on SRT files.
Creating and Importing Your Captions
The workflow is pretty straightforward. First, you'll need to transcribe all the audio from your video. Then, watch your video back and carefully log the start and end times for each line or phrase, plugging them into your text file using the format above.
Yes, this process can be time-consuming, but the accuracy you get is second to none. If you need some pointers on getting the timing just right, our guide on how to sync sound and video covers some great foundational techniques.
Once your SRT file is ready, save it with the .srt extension (for example, my-awesome-video.srt).
The final step is bringing it into your video editing software. In programs like Adobe Premiere Pro or DaVinci Resolve, you can usually just import the SRT file directly onto your timeline. It will automatically snap into place with your video, ready for you to style the text and export the final product. This method is incredibly useful for platforms that support multiple language tracks—you just need a separate SRT file for each language.
In-App Captioning for TikTok, Instagram, and YouTube
Sometimes, the best tool for the job is the one you already have open. For your short-form videos on TikTok, Instagram, and YouTube, adding captions directly inside the app is often the quickest path from idea to publish. This whole approach keeps your workflow simple and ensures your captions use the native styles that look and feel right on the platform.
The demand for captions isn't just a niche preference anymore—it's massive. In 2023 alone, a staggering 600 million social media and streaming files were subtitled. That number, highlighted by Market Research Future, shows just how standard this has become for creators everywhere.
The TikTok Auto-Captions Workflow
TikTok has made adding captions ridiculously simple. Once you’ve recorded or uploaded your video, just head over to the main editing screen.
- Look for the "Captions" icon on the right-hand menu and give it a tap.
- The app will get to work transcribing your audio automatically. It’s usually done in just a few seconds.
- Once the captions pop up, tap on them to open the text editor. This is your chance to fix any mistakes, tweak punctuation, and make sure every word is perfect.
The golden rule here is to always give it a quick proofread. The AI is pretty sharp, but it can easily mishear unique names, brand terms, or slang. A quick fix takes seconds and keeps your video looking polished and professional.
Customizing Your Instagram Reels Captions
Instagram Reels gives you a similar tool with its "Captions" sticker. But don't just stop at the default look—that’s a rookie mistake. A little customization goes a long way.
After the captions are generated, tap on them to pull up the style editor. From there, you can play around with different fonts, add a solid or semi-transparent background for better readability, or change the text color to match your brand’s vibe.
Here's a pro tip I see people mess up all the time: be careful where you place your captions. Make sure to drag the text box up from the very bottom of the screen. If you don't, it'll get hidden by Instagram's own interface—the username, description, or the like button.
Adding Captions to YouTube Shorts
The process for YouTube Shorts is just as straightforward, but it’s absolutely critical for getting your videos discovered. In the Shorts editor, tap the "Text" icon after uploading your clip. You can then type out your captions manually or, even better, hit "Timeline" to sync specific text blocks to precise moments in your video.
Properly captioning your Shorts does more than just help viewers; it gives the YouTube algorithm a full transcript to chew on. This helps the algorithm understand what your content is about and show it to the right people. If you're serious about growing your channel, our guide on YouTube Shorts editing dives into even more strategies to get your content seen.
By getting comfortable with these native tools, you can make sure every video you post is accessible, engaging, and perfectly optimized for each platform.
Pro-Level Tips for Styling, Accessibility, and SEO
Just getting your audio transcribed is only half the battle. The real art lies in treating your captions as a key design element, making them work harder for you on accessibility and SEO. These are the little details that separate the pros from the amateurs.
And believe me, this is a skill you want to master. The demand for great captioning is exploding—the market is on track to hit a staggering USD 66.21 billion by 2035. That kind of growth tells you everything you need to know about staying competitive. You can see the full market forecast on MarketResearchFuture.com.
Designing Captions for Maximum Readability
Your caption style should never be an afterthought. The whole point is to make the text so effortless to read that your audience barely realizes they’re reading. If your captions are distracting or hard to decipher, you're just giving people a reason to scroll away.
Here are a few styling rules I always stick to:
- Go for High Contrast: There's a reason the classics work. Black text with a white outline or a semi-transparent black background box is your best friend. It guarantees legibility no matter what's happening in your video, from a bright beach to a dark room.
- Keep Your Font Simple: Stick with clean, sans-serif fonts. Think Arial, Helvetica, or Open Sans. Creative, scripty fonts might look cool, but they’re a nightmare for readability, especially on the small mobile screens where most people are watching.
- Mind Your Positioning: Always aim for the lower third of the screen. Just be sure to leave a "safe zone" so your text isn't awkwardly cut off by the play bar or social media UI elements like usernames and like buttons.
A personal rule I live by: keep captions to a two-line maximum and make sure they disappear shortly after the person stops talking. This creates a natural rhythm that syncs up with the video's pacing.
Enhancing Accessibility with Non-Speech Cues
True accessibility is about more than just the words being spoken. For viewers who are deaf or hard of hearing, captions are the only way to understand the full audio context of a scene.
This is where non-speech cues are absolutely essential. By adding simple, descriptive text in brackets, you can paint a much fuller picture of the auditory environment.
Think about the difference these make:
[upbeat music playing][door closes softly][phone rings][laughter]
These tiny additions provide a richer, more inclusive experience, ensuring everyone can follow the story, catch the jokes, and feel the emotional tone of your video.
Leveraging Captions for a Powerful SEO Boost
Finally, never forget that your caption file is a goldmine of searchable text. Search engines like Google and YouTube can't watch your video, but they can crawl every single word in your SRT file or transcript. This is a huge opportunity to boost your video's discoverability.
As you polish your captions, look for natural opportunities to weave in your primary and secondary keywords. If your video is a guide on "how to add captions to videos," that exact phrase should absolutely appear in your captions. This sends a powerful signal to the algorithm about your video's topic, helping it rank for the right searches and connect with the right audience.
Answering Your Top Captioning Questions

Once you start adding captions to your videos regularly, you’ll notice the same few questions come up again and again. Let's cut through the noise and get you some clear, straightforward answers to the things I get asked most. Getting these small details right can make a huge difference.
Open Captions vs. Closed Captions
This is probably the biggest point of confusion for newcomers. The main difference really just boils down to viewer control.
Open captions are what you see on TikTok and Instagram Reels. They're "burned" directly into the video file, meaning they are a permanent part of the video and can't be turned off. This is a massive advantage on social platforms where videos autoplay on mute and you have just seconds to grab someone's attention.
Closed captions (CC), on the other hand, are a separate text file (like an SRT) that you upload with your video. This gives viewers the power to toggle them on or off. You'll see this on platforms like YouTube and Vimeo. It’s the gold standard for accessibility and lets you offer captions in multiple languages.
My rule of thumb is simple. If it's for fast-paced social media, use open captions to guarantee they're seen. For longer content on platforms that support it, always provide closed captions for a better, more flexible user experience.
How Good Is AI Captioning, Really?
Honestly, the accuracy of modern AI captioning tools is pretty staggering. With clear audio, you can expect 95% accuracy or even higher. For standard, one-person dialogue, these tools are a lifesaver and will save you a ton of time.
But they're not perfect. From my experience, AI tends to stumble on:
- Proper nouns like company names or unique personal names.
- Industry-specific jargon or complex acronyms.
- Cross-talk where multiple people are speaking at once.
- Heavy background noise or loud music that muddies the audio.
Just bake a quick two-minute proofread into your workflow. That’s usually all it takes to catch any glaring mistakes and keep your content looking sharp.
Do Captions Make a Video Look Bad?
Only if you design them badly. Clunky, hard-to-read captions can definitely be a distraction. But when you get it right, they actually elevate the entire viewing experience. Modern editors give you full control over fonts, colors, backgrounds, and positioning.
The number one priority should always be readability. A clean, sans-serif font placed neatly in the lower third of the frame is a classic for a reason. When your captions match your brand's style, they look intentional and professional, adding to your video's polish instead of detracting from it.
So, should you caption every single video? For any public-facing content—social media, your website, YouTube—the answer is an emphatic yes. The boost in accessibility and engagement is just too big to pass up. For internal company videos or personal projects, it's less critical, but it’s still a fantastic habit for making sure everyone can follow along.
Ready to create scroll-stopping videos with perfectly animated captions in minutes? ClipShort uses AI to generate engaging faceless videos, complete with customizable voiceovers and eye-catching subtitles. Stop spending hours editing and start scaling your content today. Try ClipShort for free and see how fast you can grow.