How to Convert Audio to Video for Social Media
So, what does "audio to video" actually mean? It’s simply taking an audio file—maybe a clip from your podcast or even a quick voice note—and pairing it with something visual to create a video file. This can be as straightforward as a static image with your audio playing over it, or as slick as an animated waveform with bold, eye-catching captions.
The whole point is to get your audio-first content seen on platforms built for video, like TikTok, Instagram Reels, and YouTube Shorts.
Why Turning Audio Into Video Is a Content Goldmine
In a world absolutely dominated by visual media, your audio content needs a visual ride-along to have a fighting chance. If you're leaving your podcasts, interviews, or voiceovers as audio-only files, you're missing out on a massive audience that lives and breathes on video-first platforms.
This strategy isn't just about changing a file format. It's about unlocking entirely new channels for people to find and engage with your stuff.
To give you a better idea of the payoff, here’s a quick breakdown of what this process unlocks for your content strategy.
Core Benefits of Audio to Video Conversion
| Benefit | Impact on Your Content Strategy | Example Platform |
|---|---|---|
| Expanded Audience Reach | Taps into video-first algorithms and user bases. | Instagram Reels |
| Increased Engagement | Visuals and captions capture attention, even with the sound off. | TikTok |
| Improved Accessibility | Subtitles make content understandable for silent viewers and the hearing-impaired. | YouTube Shorts |
| Content Repurposing | Turns one audio recording into multiple pieces of social media content. | All Platforms |
Ultimately, this approach transforms your audio archive from a static library into a dynamic engine for audience growth.
Expanding Your Reach to New Audiences
The biggest win here is simple: you meet your audience where they already are. Platforms like Instagram and TikTok are built for video, and their algorithms are hungry for it. When you convert your audio into a video, you're essentially feeding those algorithms exactly what they want to promote.
Think about the potential here. One 30-minute podcast episode can be diced up into a whole arsenal of high-impact content.
- Five 60-second Reels: Each highlighting a key takeaway with animated captions.
- Ten 15-second TikToks: Featuring punchy quotes or quick, actionable tips.
- A full-length YouTube video: With a simple waveform visualizer for people who prefer that platform.
This is the heart of smart content repurposing, letting a single recording fuel your content calendar for weeks. For a deeper look at getting the most out of every piece of content, check out our guide on powerful content repurposing strategies.
Meeting Modern Content Consumption Habits
Let's be real—people are often scrolling while multitasking. A video with clear, bold subtitles grabs the attention of "silent scrollers" on the bus, in a waiting room, or in a quiet office. Adding that visual layer makes your message instantly more accessible and can seriously boost how long people stick around to watch.
The data doesn't lie. By 2025, video is expected to make up a staggering 82% of all internet traffic. This shift is forcing creators to adapt their audio for visual platforms just to stay in the game.
This trend is exactly why AI video tools have exploded in popularity. They handle the heavy lifting of captioning, finding visuals, and editing, making professional-quality production available to anyone. The ability to convert audio to video is now fundamental for building a successful channel. For those looking to get a head start, you can even explore options for pre-established monetized YouTube channels to jump-start your growth.
The Automated Method Using AI Tools
If you're a creator who needs to get content out fast, the quickest way to turn an audio clip into a shareable video is with AI. Let's be honest, manual video editing is a time suck. AI-powered tools have completely changed the game, letting you crank out engaging short-form videos in minutes instead of hours.
Think about that killer 90-second insight from your last podcast. Instead of letting it get lost in a long-form episode, you can use an AI tool to spin it into a high-impact Reel or TikTok. The whole point of these platforms is to eliminate the tedious work and get your content in front of people, fast.
The process is refreshingly simple. AI does all the heavy lifting, taking your raw audio and spitting out a finished video.
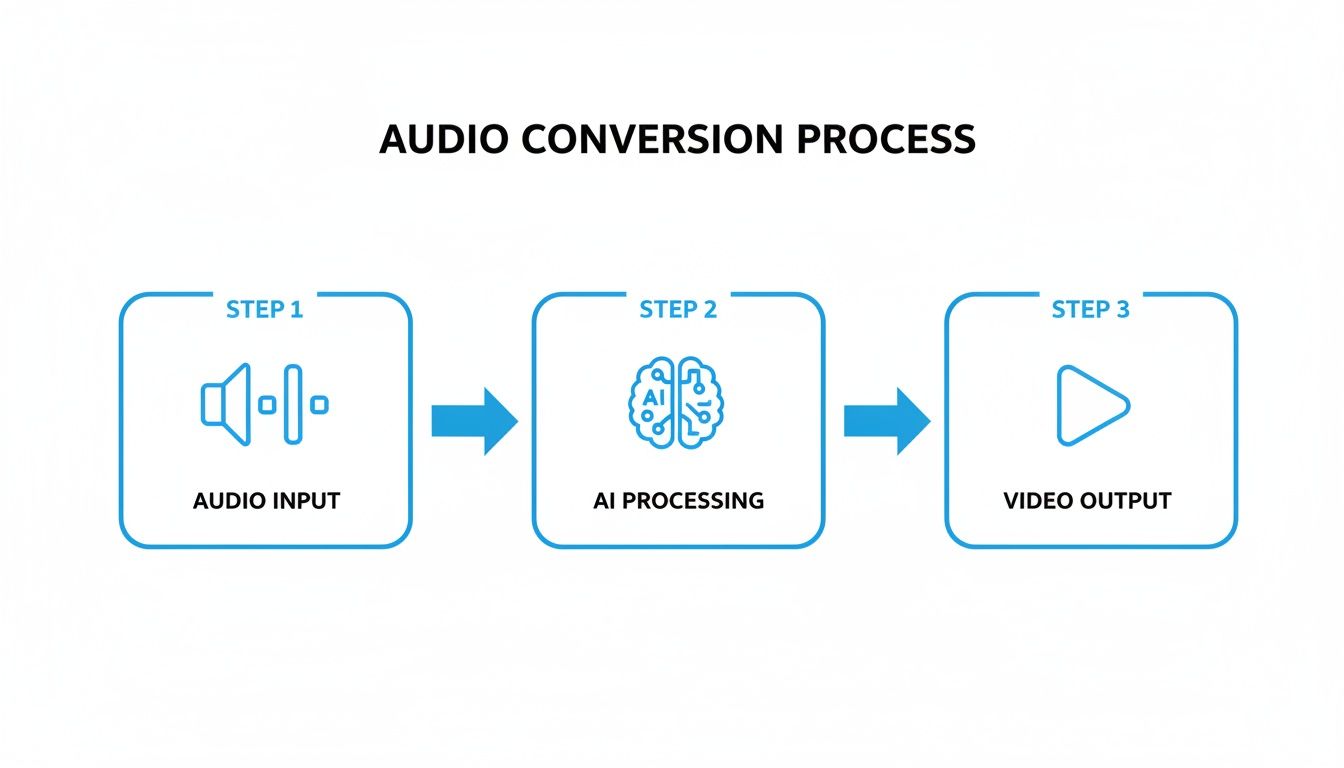
This workflow gets straight to the point: you provide the audio, and the AI handles the rest, giving you a video ready for social media.
The AI-Powered Workflow in Action
It usually starts with a simple drag-and-drop. You upload your audio file—an MP3, a WAV, whatever you've got—and the AI immediately gets to work transcribing it. This transcript is the foundation for what is arguably the most important part of any short-form video today: dynamic captions.
You don't have to sit there typing out and timing every single word. The AI generates the subtitles for you. And we're not talking about boring, static text. Good tools offer slick, animated styles, like word-by-word highlights or pop-up text that keeps your audience's eyes glued to the screen. Since so many people watch videos with the sound off, this is a non-negotiable feature.
Once your captions are set, you need to add some visual flair. Your audio can't just float in a black void. AI tools give you a few smart options here:
- Branded Images: Just upload a background with your logo and brand colors for a consistent look across all your clips.
- Animated Waveforms: The classic audiogram look. A visualizer that pulses along with your voice adds a nice, subtle touch of motion.
- Progress Bars: A simple bar at the top or bottom shows viewers how much time is left. It’s a tiny detail that can actually keep people watching longer.
- AI Stock Footage: Some of the more advanced platforms will analyze what you're saying and suggest relevant stock videos to layer in, which can seriously elevate your storytelling.
Just because it's automated doesn't mean you have zero control. You can still tweak the fonts, change the colors, and move things around to make sure everything matches your brand. The idea is to let the AI handle the grunt work so you can focus on the creative finishing touches.
Why This Method Is a Game-Changer for Creators
The biggest win here is scale. If you’re trying to feed the TikTok and Reels algorithms with multiple clips every single day, editing everything by hand just isn't realistic for a solo creator or a small team. It's a recipe for burnout.
This automated workflow lets you batch-create an entire week's worth of content in just a few hours. It turns repurposing from a chore into a smart, efficient system for growing your audience.
These tools are also built specifically for social media. They come with pre-set canvas sizes for vertical video (9:16) and export settings already optimized for each platform. That means no more guesswork trying to figure out the right specs. You get a sharp, professional-looking video every time. The technology is moving incredibly fast; for a deeper dive into how it's reshaping the industry, check out this guide on AI powered video creation.
Choosing the Right AI Tool
With so many options popping up, it can be tough to pick the right one. The key is to figure out what you really need. Some tools are fantastic for creating eye-catching captions, while others are better at finding the perfect stock footage.
If you’re looking for a great all-in-one solution, it’s worth exploring a few comparisons of the best AI video generators to see what fits your workflow and budget.
A Look at Popular AI Audio to Video Converters
Comparing leading AI tools can help you pick the right one based on your specific needs, from features to cost.
| Tool Name | Key Feature | Best For | Pricing Model |
|---|---|---|---|
| ClipShort | AI Script & Hook Generation | Creators focused on viral short-form content | Freemium & Subscription |
| Descript | All-in-one audio/video editing | Podcasters and serious content producers | Subscription-based |
| Opus Clip | Long-form video repurposing | YouTubers turning long videos into shorts | Freemium & Subscription |
| Headliner | Simple audiogram creation | Beginners who want quick, simple audio visuals | Free with paid upgrades |
Each tool has its own strengths. Your choice really depends on whether you value simplicity, advanced editing features, or pure speed.
Ultimately, using AI lets you spend less time wrestling with software and more time focused on creating great content. It’s a powerful way to squeeze every drop of value out of the audio you work so hard to produce.
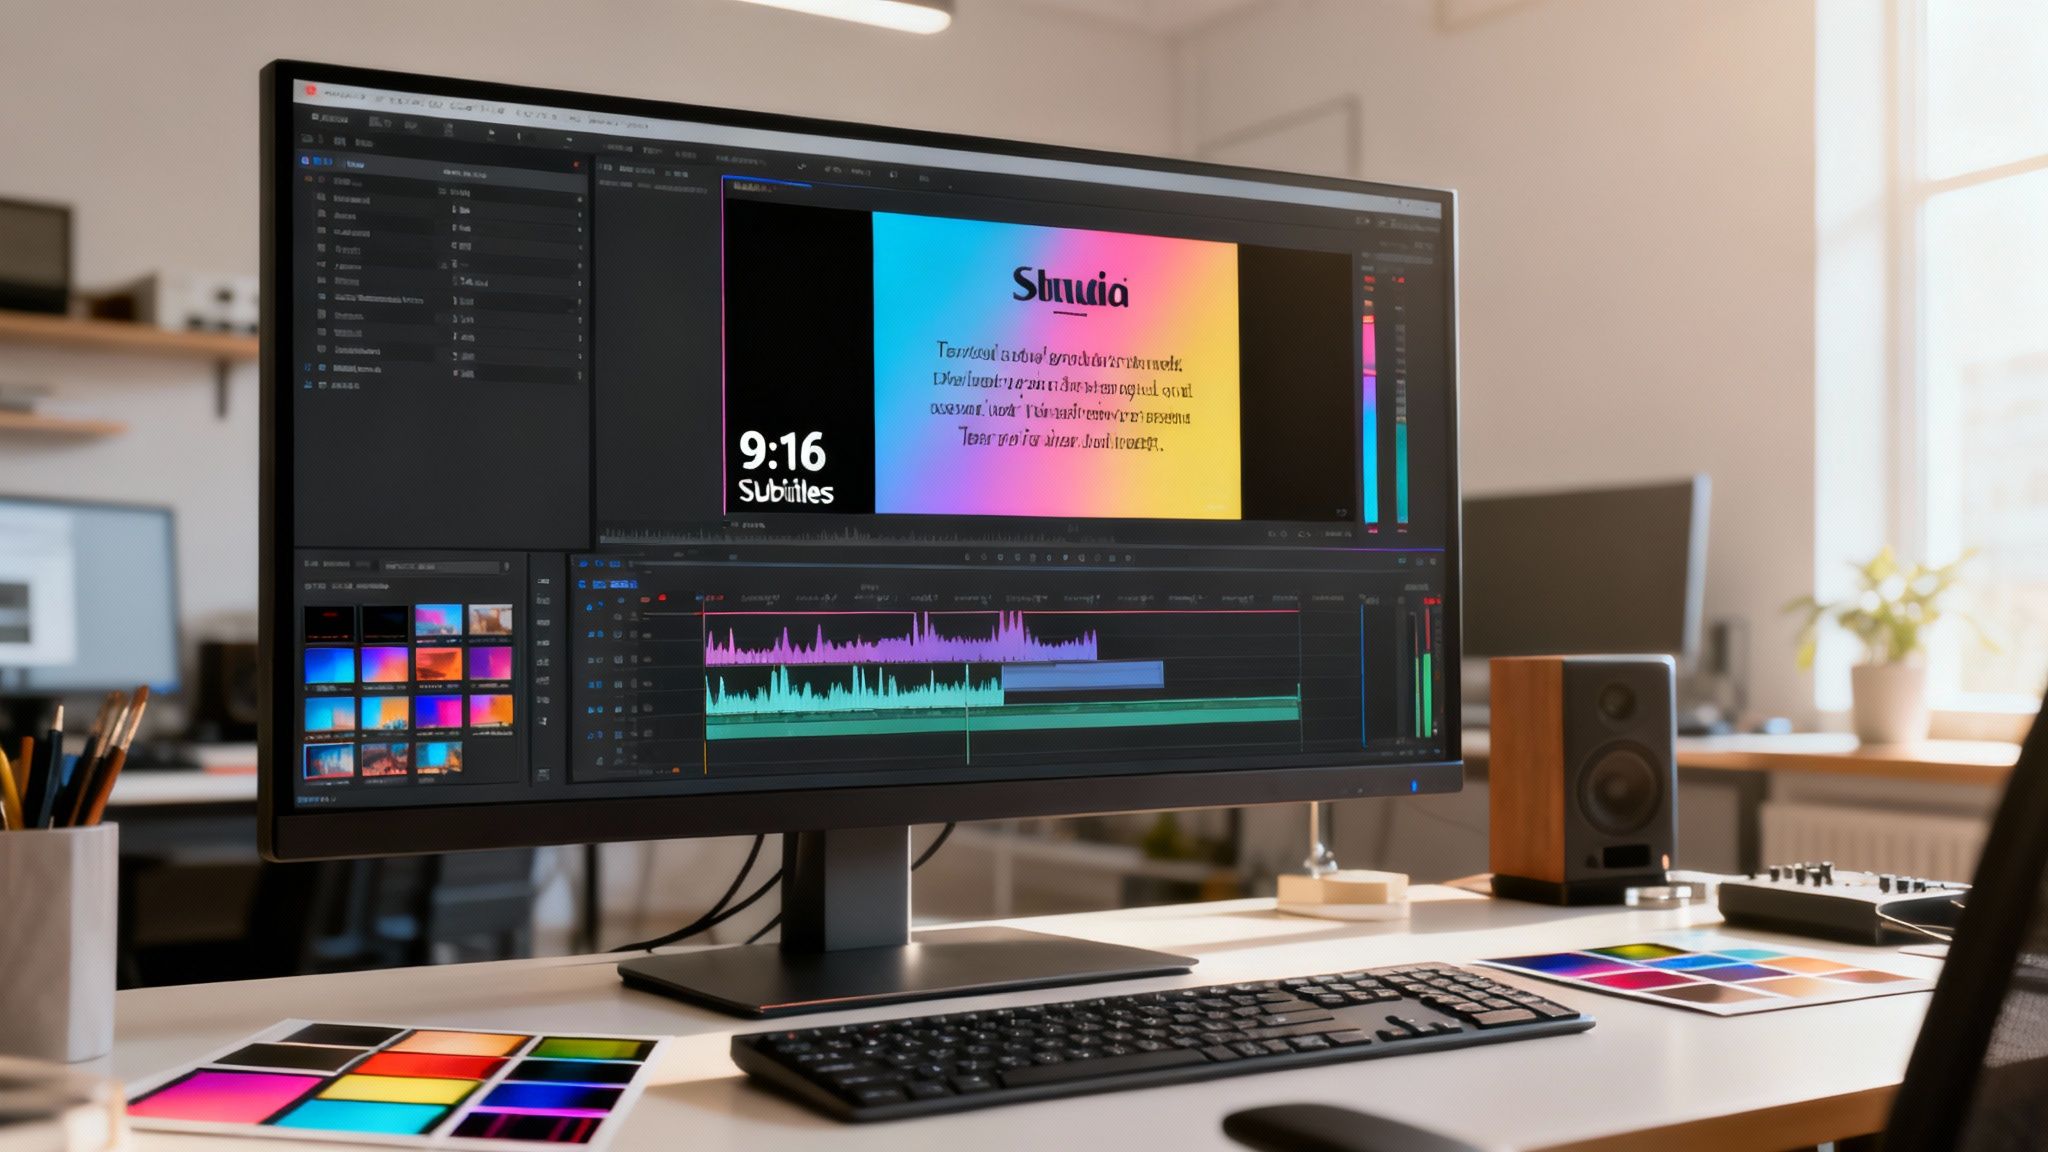
The Manual Method for Full Creative Control
AI tools are fantastic for speed, but sometimes you just need to get your hands dirty. When every pixel, font, and animation has to be perfectly on-brand, nothing beats rolling up your sleeves in professional software like Adobe Premiere Pro or DaVinci Resolve.
This path is for creators who need that next level of polish. Going manual puts you in the director's chair, giving you the final say on every single element. It definitely takes more time, but the trade-off is a degree of customization that automated tools just can't touch.
This workflow is how you build a signature look—something your audience instantly recognizes as yours.
Setting Up Your Project for Success
Before you even drop a single visual into your project, getting the setup right is non-negotiable. Your target is vertical video, which means you need to build your timeline for the 9:16 aspect ratio. This is the native format for TikTok, Instagram Reels, and YouTube Shorts.
In pretty much any pro editor, this involves creating a custom sequence with a resolution of 1080x1920 pixels. Trust me, doing this first saves a world of pain later. It guarantees your video fills the entire screen on a phone, with no ugly black bars ruining the experience.
With your canvas ready, go ahead and import your audio file. This clip is the backbone of your entire video. Drag it onto the timeline and you’ll see the waveform pop up—that's your roadmap for timing every single visual element from here on out.
Building Your Visuals from the Ground Up
Okay, your audio is in place and you've got a blank 1080x1920 canvas staring back at you. This is where the fun begins. The first thing you'll want to add is a background.
- Static Branded Image: This is the easiest route. Jump into a tool like Canva or Photoshop and design a simple background with your logo, brand colors, and maybe the title of your podcast or show. It's clean and constantly reinforces your brand identity.
- Subtle Video Loop: Want to add a bit more life? A subtle, looping video can do the trick. Think of slow-moving gradients, abstract textures, or a simple stock clip that matches the vibe of your audio.
- High-Quality Photography: If you're working with a powerful quote or a thought-provoking soundbite, pairing it with a striking, high-res photo can be incredibly effective.
The goal is to pick a background that supports the audio without stealing the show. It should enhance the experience, not dominate it.
Pro Tip: When you're building a video manually, always think in layers. Your audio is the foundation. The background sits on top of that. Every piece of text, graphic, and emoji is another layer on top. Keeping your timeline organized this way makes it so much easier to make tweaks later.
Crafting Custom Captions and Overlays
This is where the manual approach really shines. Creating subtitles by hand gives you absolute control over how they look and feel. While most editors have a decent auto-captioning feature to give you a head start, you'll want to get in there and refine the output.
This is your chance to perfect the timing, break lines for maximum readability, and style the text to be a perfect match for your brand guide.
Here are a few things to play with for more impact:
- Font and Color: Don't settle for Arial. Use your specific brand fonts and hex codes.
- Text Animation: Make words appear as they’re spoken. Even a simple fade-in or pop-in effect makes your captions feel much more dynamic and engaging.
- Highlighting Key Words: This is a classic move for a reason. Changing the color or style of important words is a powerful way to guide the viewer's attention and emphasize your core message.
But don't just stop at captions. You can design custom text overlays to make a real statement. If you're highlighting a specific quote, for example, build it out like a mini-graphic right inside your editor. This freedom to manipulate text size, placement, and style is what lets you create a visual hook that's 100% unique to you—a massive advantage in a crowded feed.
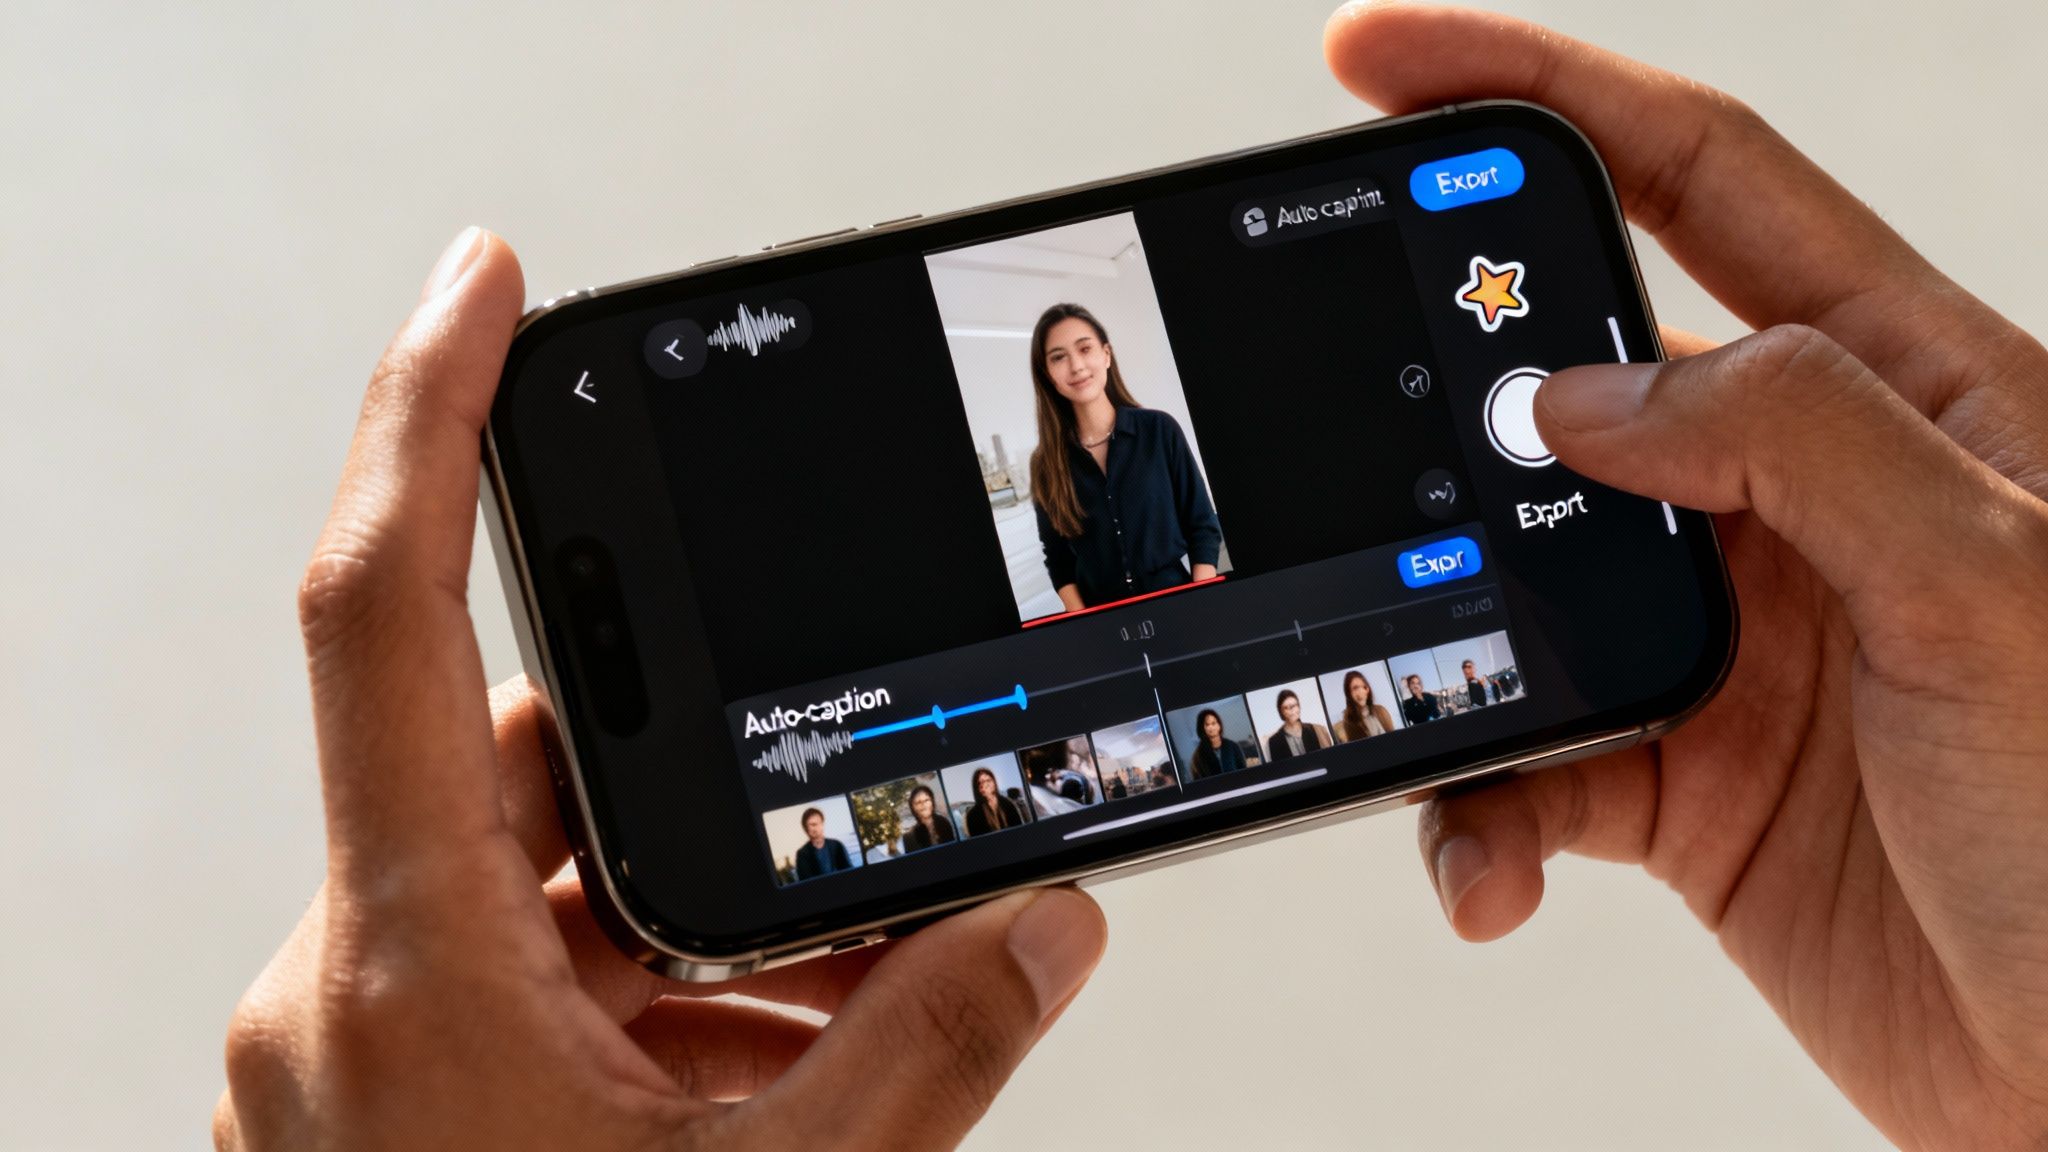
Converting Audio to Video on Your Phone
You don't need a hulking desktop setup to jump into the short-form video game. That little device in your pocket is a surprisingly powerful production studio, perfect for cranking out high-impact content when you're away from your main rig. For creators who need to be fast and flexible, converting audio to video right on your phone is the ultimate workflow.
Think about it. You just nailed a great interview or captured a brilliant, spontaneous thought on a voice memo. Instead of letting that gold sit until you get back to a computer, you can spin it into a shareable video immediately. This on-the-go capability is a huge advantage for staying timely and keeping the social media algorithms happy.
This approach lets you publish moments as they happen, keeping your content feeling fresh, authentic, and immediate.
Choosing Your Mobile Editing App
First thing's first: you need an app. The mobile editing world is crowded, but a couple of apps consistently rise to the top for their blend of power and simplicity: CapCut and InShot.
-
CapCut: This app comes from the same parent company as TikTok, so it’s practically hardwired for creating viral short-form content. It’s packed with trendy effects, filters, and audio tools you see all over the platform. Its auto-captioning is also incredibly accurate and easy to style.
-
InShot: Here's another user-friendly beast that's fantastic for straightforward video creation. You get all the essentials—trimming, splitting, adding text, music—wrapped in a clean, intuitive package. If you just want a reliable editor that gets the job done without a fuss, InShot is a solid bet.
Both are available on iOS and Android, and their free versions are more than powerful enough for most creators just starting out.
The Mobile Conversion Workflow
Once you've got your app picked out, turning audio into a video is surprisingly straightforward. The exact button layout might vary a bit, but the core process is pretty much the same everywhere.
You’ll kick things off by creating a new project and dropping in a background visual. This could be a static photo or a looping video clip straight from your phone's camera roll. I find a simple branded image or a subtle, moving background works best. Just remember to set your project's aspect ratio to 9:16 so it properly fills a phone screen.
Now, it's time to bring in your audio. Most apps give you a few ways to do this:
- Extract from a Video: Got your audio stuck inside another video file? You can easily pull just the sound out.
- Import from Files: You can grab any MP3 or WAV file you have saved on your phone.
- Record a Voiceover: You can even record audio right into the app, which is perfect for adding some quick commentary on the fly.
With your audio and visuals layered onto the timeline, you’re ready to add the single most important element for social media views.
Leveraging Mobile-Native Features
This is where phone apps really pull ahead. They are designed from the ground up for social media and come loaded with features meant to grab and hold attention.
The most crucial feature you need to master is auto-captioning. With a single tap, these apps transcribe your entire audio clip and generate perfectly timed subtitles. This is non-negotiable, since a huge percentage of people watch videos with the sound off.
After the app generates the captions, take a minute to clean them up. You can edit the text for accuracy, change the fonts and colors to match your brand, and even add slick animations to make key words pop off the screen. Don't stop there—explore other native elements like stickers, emojis, and trending effects to make your video feel dynamic and right at home in a fast-moving feed.
Getting Your Video Seen by Social Media Algorithms
Making your video is a big win, but it's really only half the job. Now, you’ve got to make sure the right people actually see it. TikTok, Instagram Reels, and YouTube Shorts each have their own quirks, but they all boil down to one thing: they reward content that grabs and holds a viewer's attention.
What you do after converting your audio is just as crucial as the conversion itself. This isn't about trying to "hack" the algorithm. It's about understanding what these platforms want and giving them high-quality, engaging content that keeps users on their apps longer. Everything from your export settings to your thumbnail text plays a role.
Nailing the Technical Settings
Before you even think about captions or hashtags, your export settings have to be on point. A file that’s poorly optimized can end up looking pixelated or getting crushed by compression, which immediately signals low quality to both viewers and the platform's algorithm.
Your goal is simple: deliver a crisp, clean video that looks fantastic on a phone. For pretty much any short-form video platform, these are the settings you need:
- Resolution: Always export at 1080x1920 pixels. This is the gold standard for high-definition vertical video.
- Frame Rate: Stick with 30 frames per second (fps). You might be tempted by 60 fps for smoother motion, but it creates a much bigger file and is overkill for most content made from audio.
- File Format: MP4 is the universal language of video. It hits the sweet spot between quality and file size.
- Bitrate: For a 1080p video running at 30 fps, a target bitrate between 10-15 Mbps is perfect for keeping things sharp without creating a massive file.
Getting these basics right is a non-negotiable first step. If you want to go deeper, we've broken down all the specs in our guide to the best vertical video dimensions.
The Real Power of Dynamic Subtitles
I know we've talked about captions before, but I can't stress this enough: they are absolutely critical for performance. With a huge chunk of users watching videos with the sound off, subtitles are no longer just an accessibility feature—they're a primary driver of engagement.
Think of subtitles as your visual hook. If the text is boring, hard to read, or out of sync, viewers are gone. The algorithm sees that drop-off and learns not to show your video to more people.
You need to make your subtitles a core part of the experience. Use bold fonts, your brand colors, and even subtle animations like word-by-word highlights to keep people's eyes glued to the screen. That visual stimulation is how you maximize watch time, which is the metric that matters most to every single platform.
Crafting Captions and Thumbnails That Stop the Scroll
Your video's caption is your opening line. It can't just describe what's in the video; it has to spark curiosity and get people to engage. Try asking a question, stating a controversial opinion, or using a hook that makes someone need to hear what you have to say.
Your thumbnail (or "cover," as it's called on TikTok and Reels) does the same job visually. It’s the handshake that convinces someone to stop scrolling.
- Pick a Clear Frame: Grab a moment from the video that's visually compelling. Avoid anything blurry or chaotic.
- Overlay Some Text: Add a short, punchy title directly onto the thumbnail itself. This text should nail the core value or question of the video (e.g., "The #1 Podcasting Mistake").
- Keep it Consistent: Develop a recognizable thumbnail style using your brand's fonts and colors. It makes your profile grid look clean and helps your followers spot your content instantly.
Using Hashtags to Feed the Algorithm
Hashtags aren't just for decoration. They are data points that tell the algorithm exactly what your content is about and who might want to see it. A good hashtag strategy is what helps your video find its first wave of viewers, which is essential for building momentum.
Don't just throw in massive, generic tags like #fyp or #video. A much smarter approach is to use a tiered strategy:
- Broad Category Tags (1-2): These describe your general niche. Think
#podcastclipsor#marketingtips. - Specific Topic Tags (2-3): These get granular about the video's subject. For example,
#contentstrategyor#seoexpert. - Audience-Defining Tags (1-2): These speak directly to the person you want to watch. Try
#smallbusinessowneror#solopreneur.
This mix gives the algorithm crystal-clear signals, helping it push your video out to a targeted audience that’s more likely to engage.
There’s a reason the demand for repurposing audio is soaring. The audio streaming market is on track to blow past $100 billion by 2030, and with 91% of businesses already using video, turning your audio library into shareable clips is a direct line to discovery. You can see more insights on this growing market trend on MordorIntelligence.com. Following these steps helps you tap into that massive demand and get your voice heard.
Common Questions About Turning Audio into Video
Jumping into any new creative process is going to bring up questions. It's totally normal. As you start turning your audio clips into videos, you’ll probably hit a few snags or wonder about the best way to do things.
We’ve gathered the most common questions we hear and answered them right here. Think of this as your cheat sheet for sidestepping common mistakes and creating content with confidence.
What’s the Best Audio Format to Use?
For the absolute best results, always start with the highest quality audio file you have. If you’ve got an uncompressed format like WAV or AIFF, use it. These files are the audio equivalent of a raw photo—they contain all the original data, giving you the richest sound to work with.
But let's be realistic. Most of the time, for social media content, a high-quality MP3 is perfectly fine. Just make sure it’s encoded at 320 kbps. This gives you a fantastic balance of crisp sound quality and a much smaller file size, which makes everything upload and process way faster.
The most important thing to remember is this: the conversion process can’t fix bad audio. No matter what tool you use, it can only work with what you give it. Always start with the cleanest, clearest recording you possibly can.
Should I Turn My Whole Podcast Episode into a Video?
You can convert a full one-hour podcast into a single video, but it's not a winning strategy for short-form platforms. Attention spans on TikTok, Reels, and Shorts are measured in seconds, not hours. A long, unbroken video is practically guaranteed to lose viewers.
A much smarter approach is to think like a content surgeon. Listen through your full episode with a specific goal: find the gold.
- Hunt for the most powerful quotes.
- Isolate the most actionable tips or takeaways.
- Pinpoint the funniest one-liners or most surprising soundbites.
Each of these golden nuggets, usually between 30 to 90 seconds, can become its own high-impact video. This "micro-content" strategy gives you a whole library of shareable assets from a single recording, perfectly designed for how people actually watch content online.
How Can I Make My Videos Look More Professional?
You don't need a Hollywood budget to make your videos look polished. It really just comes down to focusing on a few key details that signal quality and care. Consistently nail these three things, and you'll see a massive difference.
- Use High-Resolution Visuals: Never, ever use a blurry or pixelated background. Whether it's a static image or a video clip, make sure it’s at least 1080p (1920x1080 pixels). A crisp, clean background instantly makes your entire video feel more legit.
- Develop a Consistent Brand Style: Ditch the default fonts and colors. Create a simple visual template using your brand’s specific fonts and color palette for captions and any on-screen text. This kind of consistency builds brand recognition and makes your content look intentional, not accidental.
- Add Subtle Motion: A completely static video can feel dead on arrival. You need to introduce subtle movement to hold the viewer's eye. This could be an animated waveform that pulses with the audio, a slow zoom on your background image, or dynamic captions where words appear as they're spoken.
Where Can I Find Free Backgrounds for My Videos?
The good news is you don’t need to be a pro photographer or videographer to find stunning visuals. There’s a treasure trove of amazing, royalty-free resources out there that won't cost you a dime.
Sites like Pexels, Unsplash, and Pixabay are creator favorites for a reason. They offer gigantic libraries of high-quality photos and videos that are completely free to use, even for commercial projects. If you find yourself needing more variety, a subscription service like Envato Elements can be a great investment.
Better yet, many of the newer AI tools for converting audio to video now come with their own built-in stock media libraries. This is a huge time-saver, as the AI can often suggest relevant visuals based on what you're talking about, knocking one more step out of your workflow.
Ready to turn your best audio clips into scroll-stopping social media videos without the hassle? ClipShort uses AI to generate dynamic captions, find engaging visuals, and create polished short-form content in minutes. Start creating for free today at ClipShort.co.